What your should know
Tools
- vmstat
Your system parameters:
Your test parameters:
IO’s Per Second(IOPS)
random io and sequential io
start from dd test (install centos 7 to u-disk)
[root@localhost Downloads]# dd if=/home/dennis/Downloads/CentOS-7.0-1406-x86_64-DVD.iso of=/dev/sdc
using /proc/diskstats
[dennis@localhost Downloads]$ cat /proc/diskstats
   8   0 sda 141736 59689 8916560 2493999 102005 133358 13766420 6019722 1 954049 8513774
   8   1 sda1 286 562 3822 5720 7 1 28 156 0 4959 5875
   8   2 sda2 141324 59017 8910850 2482584 90409 133357 13766392 5797210 1 762103 8279724
 253   0 dm-0 14247 0 113976 102438 61899 0 495192 6397303 0 45071 6499746
 253   1 dm-1 151287 0 5630082 3598603 47156 0 1021320 5247386 0 551034 8846229
 253   2 dm-2 35848 0 3166248 352901 115404 0 12249880 2422762 1 524204 2775689
   8  16 sdb 152 871 2311 604 0 0 0 0 0 564 604
   8  17 sdb1 70 801 1095 280 0 0 0 0 0 262 280
   8  32 sdc 248265 108 1986984 316895 5710 170143 1370400 48417446 158 346876 49258416
   8  33 sdc1 248249 108 1986856 316866 5710 170143 1370400 48417446 158 346847 49258387
- [dennis@localhost Downloads]$ cat /proc/diskstats | grep "sdc "
  下面的显示去掉了 "8   32 sd "
  +   1     2    3        4    5     6        7      8       9     10      11
  + 132725 108 1062664 167643 2681  81983  643440  24022041  147 177399  24801880
  + 274044 108 2193216 348847 6582  195199 1579680 54459810  150 388700  55296467
  + 480307 108 3843320 608357 13408 392863 3217920 101917275 139 719423  103013695
  + 636845 108 5095624 802159 18568 542271 4456320 138060107 132 971278  139338459
  + 717802 108 5743280 902925 21254 620223 5100960 156763894 134 1101859 158182895
- 第1个域:读完成次数 ----- 读磁盘的次数,成功完成读的总次数。
- 第2个域:合并读完成次数, 第6个域:合并写完成次数。为了效率可能会合并相邻
           的读和写。从而两次4K的读在它最终被处理到磁盘上之前可能会变成一次
           8K的读,才被计数(和排队),因此只有一次I/O操作。这个域使你知
  道这样的操作有多频繁。
- 第3个域:读扇区的次数,成功读过的扇区总次数。
- 第4个域:读花费的毫秒数,这是所有读操作所花费的毫秒数
           (用make_request()到end_that_request_last()测量)
- 第5个域:写完成次数 ----写完成的次数,成功写完成的总次数。
- 第6个域:合并写完成次数 -----合并写次数。
- 第7个域:写扇区次数 ---- 写扇区的次数,成功写扇区总次数。
- 第8个域:写操作花费的毫秒数  ---  写花费的毫秒数,这是所有写操作所花费的毫秒数
- 第9个域:正在处理的输入/输出请求数 -- -I/O的当前进度,只有这个域应该是0。
           当请求被交给适当的request_queue_t时增加和请求完成时减小。
- 第10个域:输入/输出操作花费的毫秒数  ----花在I/O操作上的毫秒数,这个域会增长只要field 9不为0。
- 第11个域:输入/输出操作花费的加权毫秒数 -----  加权,花在I/O操作上的毫秒数,
            在每次I/O开始,I/O结束,I/O合并时这个域都会增加。这可以给I/O完成
            时间和存储那些可以累积的提供一个便利的测量标准。
using vmstat
[dennis@localhost Downloads]$ vmstat 1 10
procs -----------memory---------- ---swap-- -----io---- -system-- ----cpu----
 r  b   swpd   free   buff  cache   si   so   bi    bo   in   cs us sy id wa
 0  2 262060  79832 1290864 736688  0    2    82    80  165  143  5  1 92  2
 0  2 262060  81964 1279336 746696  0    0  5176  3840 5693 10504  5 10 23 62
 0  2 262060  75888 1282288 749680  0    0  5896  3840 5259 11483  5  5 41 49
 0  2 262060  70184 1285204 752636  0    0  5860     0 5213 11354  6  2 39 53
 1  2 262060  79092 1281472 747172  0    0  5668  3904 5047 11017  5  4 43 49
 1  2 262060  79584 1284256 743532  0    0  5832     0 5004 11202  5  2 43 50
 0  2 262060  77532 1287020 742796  0    0  5672  3840 5126 11111  6  3 39 53
 0  2 262060  79668 1289484 738468  0    0  5316     0 5598 10422  5  5 23 68
 0  2 262060  79536 1290632 737000  0    0  5180  3840 4860 10482  6  3 41 50
 0  2 262060  79880 1291936 735188  0    0  5160     0 5469 10400  5  6 27 62

[dennis@localhost Downloads]$ vmstat -d
disk- ------------reads------------ ------------writes----------- -----IO------
       total merged sectors      ms  total merged sectors      ms   cur   sec
sda   188079  70330 16034138 2811643 108057 169484 14406740 8013520   0  1118
dm-0   15970      0  127760  112213  93653      0  749224  16348510   0    70
dm-1  181140      0 6578234 4012264  51721      0 1236960   7818610   0   681
dm-2   61516      0 9321616  477028 121227      0 12420520  2505467   0   622
sdb      152    871    2311     604      0      0       0         0   0     0
sdc   1012855   108 8103704 1284706  33810 978925 8101888 241555468   0  1636
using top(using man top for help)
using iostat(using man iostat for help)
[dennis@localhost Downloads]$ su -c 'yum install sysstat -y'
[dennis@localhost Downloads]$ iostat -x 1 3
Linux 3.15.6-200.fc20.x86_64 (localhost.localdomain)     07/30/2014     _x86_64_    (2 CPU)

avg-cpu:  %user   %nice %system %iowait  %steal   %idle
           4.59    0.15    1.48    2.20    0.00   91.59

Device:         rrqm/s   wrqm/s     r/s     w/s    rkB/s    wkB/s avgrq-sz avgqu-sz   await r_await w_await  svctm  %util
sda               0.46     1.11    1.25    0.72    53.26    48.59   103.44     0.07   36.97   15.02   75.16   3.76   0.74
dm-0              0.00     0.00    0.10    0.61     0.42     2.43     8.00     0.11  156.53    7.06  182.19   0.65   0.05
dm-1              0.00     0.00    1.21    0.34    21.67     4.18    33.36     0.08   51.41   22.36  152.90   2.90   0.45
dm-2              0.00     0.00    0.41    0.80    31.16    41.98   120.98     0.02   16.56    7.58   21.12   3.43   0.41
sdb               0.01     0.00    0.00    0.00     0.01     0.00    15.20     0.00    3.97    3.97    0.00   3.71   0.00
sdc               0.00     6.08    6.77    0.21    27.07    25.02    14.94     1.52  217.29    1.27 7226.26   1.52   1.06

avg-cpu:  %user   %nice %system %iowait  %steal   %idle
           2.91    0.00    9.22   52.91    0.00   34.95

Device:         rrqm/s   wrqm/s     r/s     w/s    rkB/s    wkB/s avgrq-sz avgqu-sz   await r_await w_await  svctm  %util
sda               0.00   660.00   22.00    8.00  2816.00  3404.00   414.67     0.08    2.83    0.50    9.25   1.63   4.90
dm-0              0.00     0.00    0.00  666.00     0.00  2664.00     8.00     7.13   10.84    0.00   10.84   0.06   3.80
dm-1              0.00     0.00    0.00    0.00     0.00     0.00     0.00     0.00    0.00    0.00    0.00   0.00   0.00
dm-2              0.00     0.00   22.00    0.00  2816.00     0.00   256.00     0.01    0.50    0.50    0.00   0.50   1.10
sdb               0.00     0.00    0.00    0.00     0.00     0.00     0.00     0.00    0.00    0.00    0.00   0.00   0.00
sdc               0.00     0.00  719.00   15.00  2876.00  1800.00    12.74   150.38  197.33    1.32 9592.53   1.36 100.00

avg-cpu:  %user   %nice %system %iowait  %steal   %idle
           3.06    0.00    3.57   51.02    0.00   42.35

Device:         rrqm/s   wrqm/s     r/s     w/s    rkB/s    wkB/s avgrq-sz avgqu-sz   await r_await w_await  svctm  %util
sda               0.00     0.00   23.00    1.00  2944.00     4.00   245.67     0.01    0.50    0.52    0.00   0.50   1.20
dm-0              0.00     0.00    0.00    0.00     0.00     0.00     0.00     0.00    0.00    0.00    0.00   0.00   0.00
dm-1              0.00     0.00    0.00    1.00     0.00     4.00     8.00     0.00    0.00    0.00    0.00   0.00   0.00
dm-2              0.00     0.00   23.00    0.00  2944.00     0.00   256.00     0.01    0.52    0.52    0.00   0.52   1.20
sdb               0.00     0.00    0.00    0.00     0.00     0.00     0.00     0.00    0.00    0.00    0.00   0.00   0.00
sdc               0.00   928.00  733.00   15.00  2932.00  1800.00    12.65   136.75  211.08    1.36 10459.40   1.34 100.00
[dennis@localhost Downloads]$ watch iostat -x
using shell script monitor_io_stats.sh
#!/bin/sh
/etc/init.d/syslog stop
echo 1 > /proc/sys/vm/block_dump
sleep 60
dmesg | awk '/(READ|WRITE|dirtied)/ {process[$1]++} END {for (x in process) \
print process[x],x}' |sort -nr |awk '{print $2 " " $1}' | \
head -n 10
echo 0 > /proc/sys/vm/block_dump
/etc/init.d/syslog start
IOMeter, using for testing block device
8 per targetLast Update1SANergy, using for testing filesystem(Samba)
Performance TesterRead test or Write test102401024Iozone: a filesystem benchmark tool
make linux-AMD64(NOTICE: check you cpu model and select correct command for compile)FIO
fio --filename=/dev/sda3 --direct=1 --iodepth 1 --thread --rw=read --ioengine=psync --bs=4k --size=2G --numjobs=10 --runtime=100 --group_reporting --name=mytestfio --filename=/dev/sda3 --direct=1 --iodepth 1 --thread --rw=write --ioengine=psync --bs=4k --size=2G --numjobs=10 --runtime=100 --group_reporting --name=mytestfio --filename=/dev/sda3 --direct=1 --iodepth 1 --thread --rw=randread --ioengine=psync --bs=4k --size=2G --numjobs=10 --runtime=100 --group_reporting --name=mytestfio --filename=/dev/sda3 --direct=1 --iodepth 1 --thread --rw=randwrite --ioengine=psync --bs=4k --size=2G --numjobs=10 --runtime=100 --group_reporting --name=mytestfio --filename=/dev/sda3 --direct=1 --iodepth 1 --thread --rw=randrw --rwmixread=70 --ioengine=psync --bs=4k --size=2G --numjobs=10 --runtime=100 --group_reporting --name=mytest --ioscheduler=noopblktrace: is a block layer IO tracing mechanism which provides detailed information
about request queue operations up to user space.
fio --filename=/dev/sda3 --direct=1 --iodepth 1 --thread --rw=read --ioengine=psync --bs=4k --size=2G --numjobs=10 --runtime=100 --group_reporting --name=mytestTroubleshooting high uitl of iostat command
iostat -x 2 5 to view the disk informationTroubleshooting high uitl of iostat command
ds2img.py (DataStructure To Image)
A python script transfer c header file which contains lots of data structures
to a dot script, and then use dot to convert to a image file
Usage: ds2imgpy -i INPUT_FILE -f png|svg -o OUTPUT_FILE [-d DOT_FILE]

-i  input file which have structures"
-f  image fomat, only support png and svg"
-o  output file, image file"
-d  dot script file, default is tmp.dot"

e.g:

python ds2img.py -i t.h -f png -o t.png
Waiting for your advices
You can get the latest version from:
https://github.com/matrix207/scripts/blob/master/ds2img/ds2img.py
#!/usr/bin/python
#####################################################################
# Generate dot script file from c file, which have lots of structures
#
# You can get the latest version from:
# https://github.com/matrix207/scripts/blob/master/ds2img/ds2img.py
#
# Warning: Not support structure contain other structure!
#
# Depends:
#     1. python
#     2. graphviz
#
# History:
#    v1.0  2014-07-28  Dennis  implement generate_relation function
#                              add parse option funtion
#    v0.1  2014-07-27  Dennis  Create
#####################################################################

import os
import re
import sys
import getopt
import datetime

version = "v1.0 Create by Dennis 2014-07-28"
debug = 0

def is_comment(line):
    if '\\' in line:
        return true
    print true

# process each line
def process(line):
    print line,

def get_struct_name(line):
    print line,

def get_datetime():
    today = datetime.datetime.now()
    print today.strftime('%Y-%m-%d %H:%M:%S')

def generate_dot_header(output_file):
    if debug :
        print "generating dot header"
    f=open(output_file,'a+')
    print>>f, "/**********************************************"
    print>>f, "* Auto generate by ds2img.py"
    print>>f, "* Author:  matrix207"
    print>>f, "* Date  :  %s" % datetime.datetime.now().strftime('%Y-%m-%d %H:%M:%S')
    print>>f, "**********************************************/\n"
    print>>f, "digraph DS2IMG {"
    print>>f, "    node [shape=record fontsize=12 fontname=Courier style=filled];"
    print>>f, "    edge[color=blue]; rankdir=LR;"
    print>>f, ""
    f.close()

def generate_dot_end(output_file):
    if debug :
        print "generating dot end"
    f=open(output_file,'a+')
    print>>f, "}"
    f.close()

def generate_struct_header(output_file, struct_name):
    if debug :
        print "generating struct header"
    f=open(output_file,'a+')
    print>>f, "subgraph cluster_%s {" % struct_name
    print>>f, "    node [shape=record fontsize=12 fontname=Courier style=filled];"
    print>>f, "    color = lightgray; style=filled; label = \"struct %s \"; edge[color=\"#2e3436\"];" % struct_name
    print>>f, "    node_%s [shape=record label=\"<f0>*** struct %s ***\\" % (struct_name, struct_name)
    f.close()

def generate_struct_member(output_file, index, member_name):
    if debug :
        print "generating struct member"
    f=open(output_file,'a+')
    print>>f, "|<f%d>%s\\n\\" % (index, member_name)
    f.close()

def generate_struct_end(output_file):
    if debug :
        print "generating struct end"
    f=open(output_file,'a+')
    print>>f, "\"];"
    print>>f, "}"
    print>>f, ""
    f.close()

def generate_relation(output_file, structs_name, structs):
    if debug :
        print "generating relation"
    f=open(output_file,'a+')
    print>>f, "#relation "
    # structs_name contain all structure name
    # structs      contain all structures, include structure name and it's member name
    for a in structs_name:           # structs_name[a] is structure name
        for b in structs:            # b is structure name
            for c in structs[b]:     # c is member index, structs[b][c] is member name
                # only match structure name
                tmp = structs[b][c].split(' ')
                #if structs_name[a] in structs[b][c]:
                if tmp[1]==structs_name[a]:
                    #print "%s contain %s\n" % (b,structs_name[a])
                    #print "%s:<f%d> -> %s:f0\n" % (b,c,structs_name[a])
                    print>>f, "node_%s:<f%d> -> node_%s:f0;" % (b,c,structs_name[a])
    print>>f, ""
    f.close()

def clean_multi_space(line):
    line = re.sub(r' +', ' ', line)
    return line

def clean_array_size(line):
    line = re.sub(r'\[.+\]', '[]', line)
    return line

def clean_specify_dirty(line):
    line = re.sub(r'\[.+<<.+\]', '[]', line)
    return line

# handle line which has comment information
def handle_comment(line):
    pos = line.find("/*")
    if pos > 0:
        line = re.sub(r'/\*.+\*/', '', line)
        line = line.strip()
    return line

def struct2dot(input_file, output_file):
    generate_dot_header(output_file)
    reader = open(input_file, 'r')
    i = 1
    structs = {}
    structs_name = {}
    while True:
        line = reader.readline()
        if not line:
            break
        # skip the comment line
        pos = line.find("/")
        if pos == 0:
            continue
        if pos > 0:
            handle_comment(line)
        m = re.match('^struct (\w+) {$',line)
        if m: # Find structure start
            structs_name[i] = m.group(1)
            st_name = m.group(1)
            i += 1
            generate_struct_header(output_file, m.group(1))
            structs[m.group(1)] = {}
            j = 1
            while True:
                line = reader.readline()
                if not line:
                    break
                line = line.strip();
                if len(line) == 0:
                    continue
                # skip the comment line
                pos = line.find("/")
                if pos == 0:
                    continue
                if pos > 0:
                    line = handle_comment(line)
                line = clean_specify_dirty(line)
                line = clean_multi_space(line)
                m = re.match('^};$',line)
                if m: # Find structure end
                    generate_struct_end(output_file)
                    break
                structs[st_name][j] = line
                generate_struct_member(output_file, j, line)
                j += 1
    reader.close()
    generate_relation(output_file, structs_name, structs)
    generate_dot_end(output_file)

def dot2png(input_file, output_file):
    cmdline = "dot -Tpng " + input_file + " -o " + output_file
    if debug:
        print cmdline
    os.system(cmdline)

def clean_file(input_file):
    cmdline = "> " + input_file
    os.system(cmdline)

# Test Function
def test(input_file, output_file):
    #find_comment(sys.argv[1])
    generate_dot_header(output_file)
    generate_struct_header(output_file, "func_test")
    generate_struct_member(output_file, 1, "int test_a_13;")
    generate_struct_member(output_file, 2, "int test_a_13;")
    generate_struct_member(output_file, 3, "int test_a_13;")
    generate_struct_end(output_file)
    generate_dot_end(output_file)

def find_comment(input_file):
    reader = open(input_file, 'r')
    while True:
        line = reader.readline()
        if len(line) == 0:
            break
        pos = line.find("/*")
        if pos>=0:
            print line,
    reader.close()

def usage(bin_file):
    print "Usage: %s -i INPUT_FILE -f png|svg -o OUTPUT_FILE [-d DOT_FILE]" % bin_file
    print "      -i  input file which have structures"
    print "      -f  image fomat, only support png and svg"
    print "      -o  output file, image file"
    print "      -d  dot script file, default is tmp.dot"
    print "  e.g:\n\tpython %s -i t.h -f png -o t.png" % bin_file
    sys.exit(1)

if __name__ == '__main__':
    paramlen = len(sys.argv)

    config = {
        "input":"",
        "format":"",
        "output":"",
        "dotfile":"tmp.dot",
    }
    opts, args = getopt.getopt(sys.argv[1:], 'hi:f:o:d:',
        [
        'input=',
        'format=',
        'output=',
        'dotfile=',
        'help'
        ]
    )

    for option, value in opts:
        if  option in ["-h","--help"]:
            usage(sys.argv[0])
        elif option in ['--input', '-i']:
            config["input"] = value
        elif option in ['--output', '-o']:
            config["output"] = value
        elif option in ['--format', '-f']:
            config["format"] = value
        elif option in ['--dotfile', '-d']:
            config["dotfile"] = value
        else:
            usage(sys.argv[0])

    if config["input"] == "" or config["output"]=="" or config["format"]=="" :
        usage(sys.argv[0])


    clean_file(config["dotfile"])

    struct2dot(config["input"], config["dotfile"])

    # generate graphic
    filename = os.path.basename(sys.argv[1])
    png_file = filename + ".png"
    dot2png(config["dotfile"], config["output"])

    print "Done"
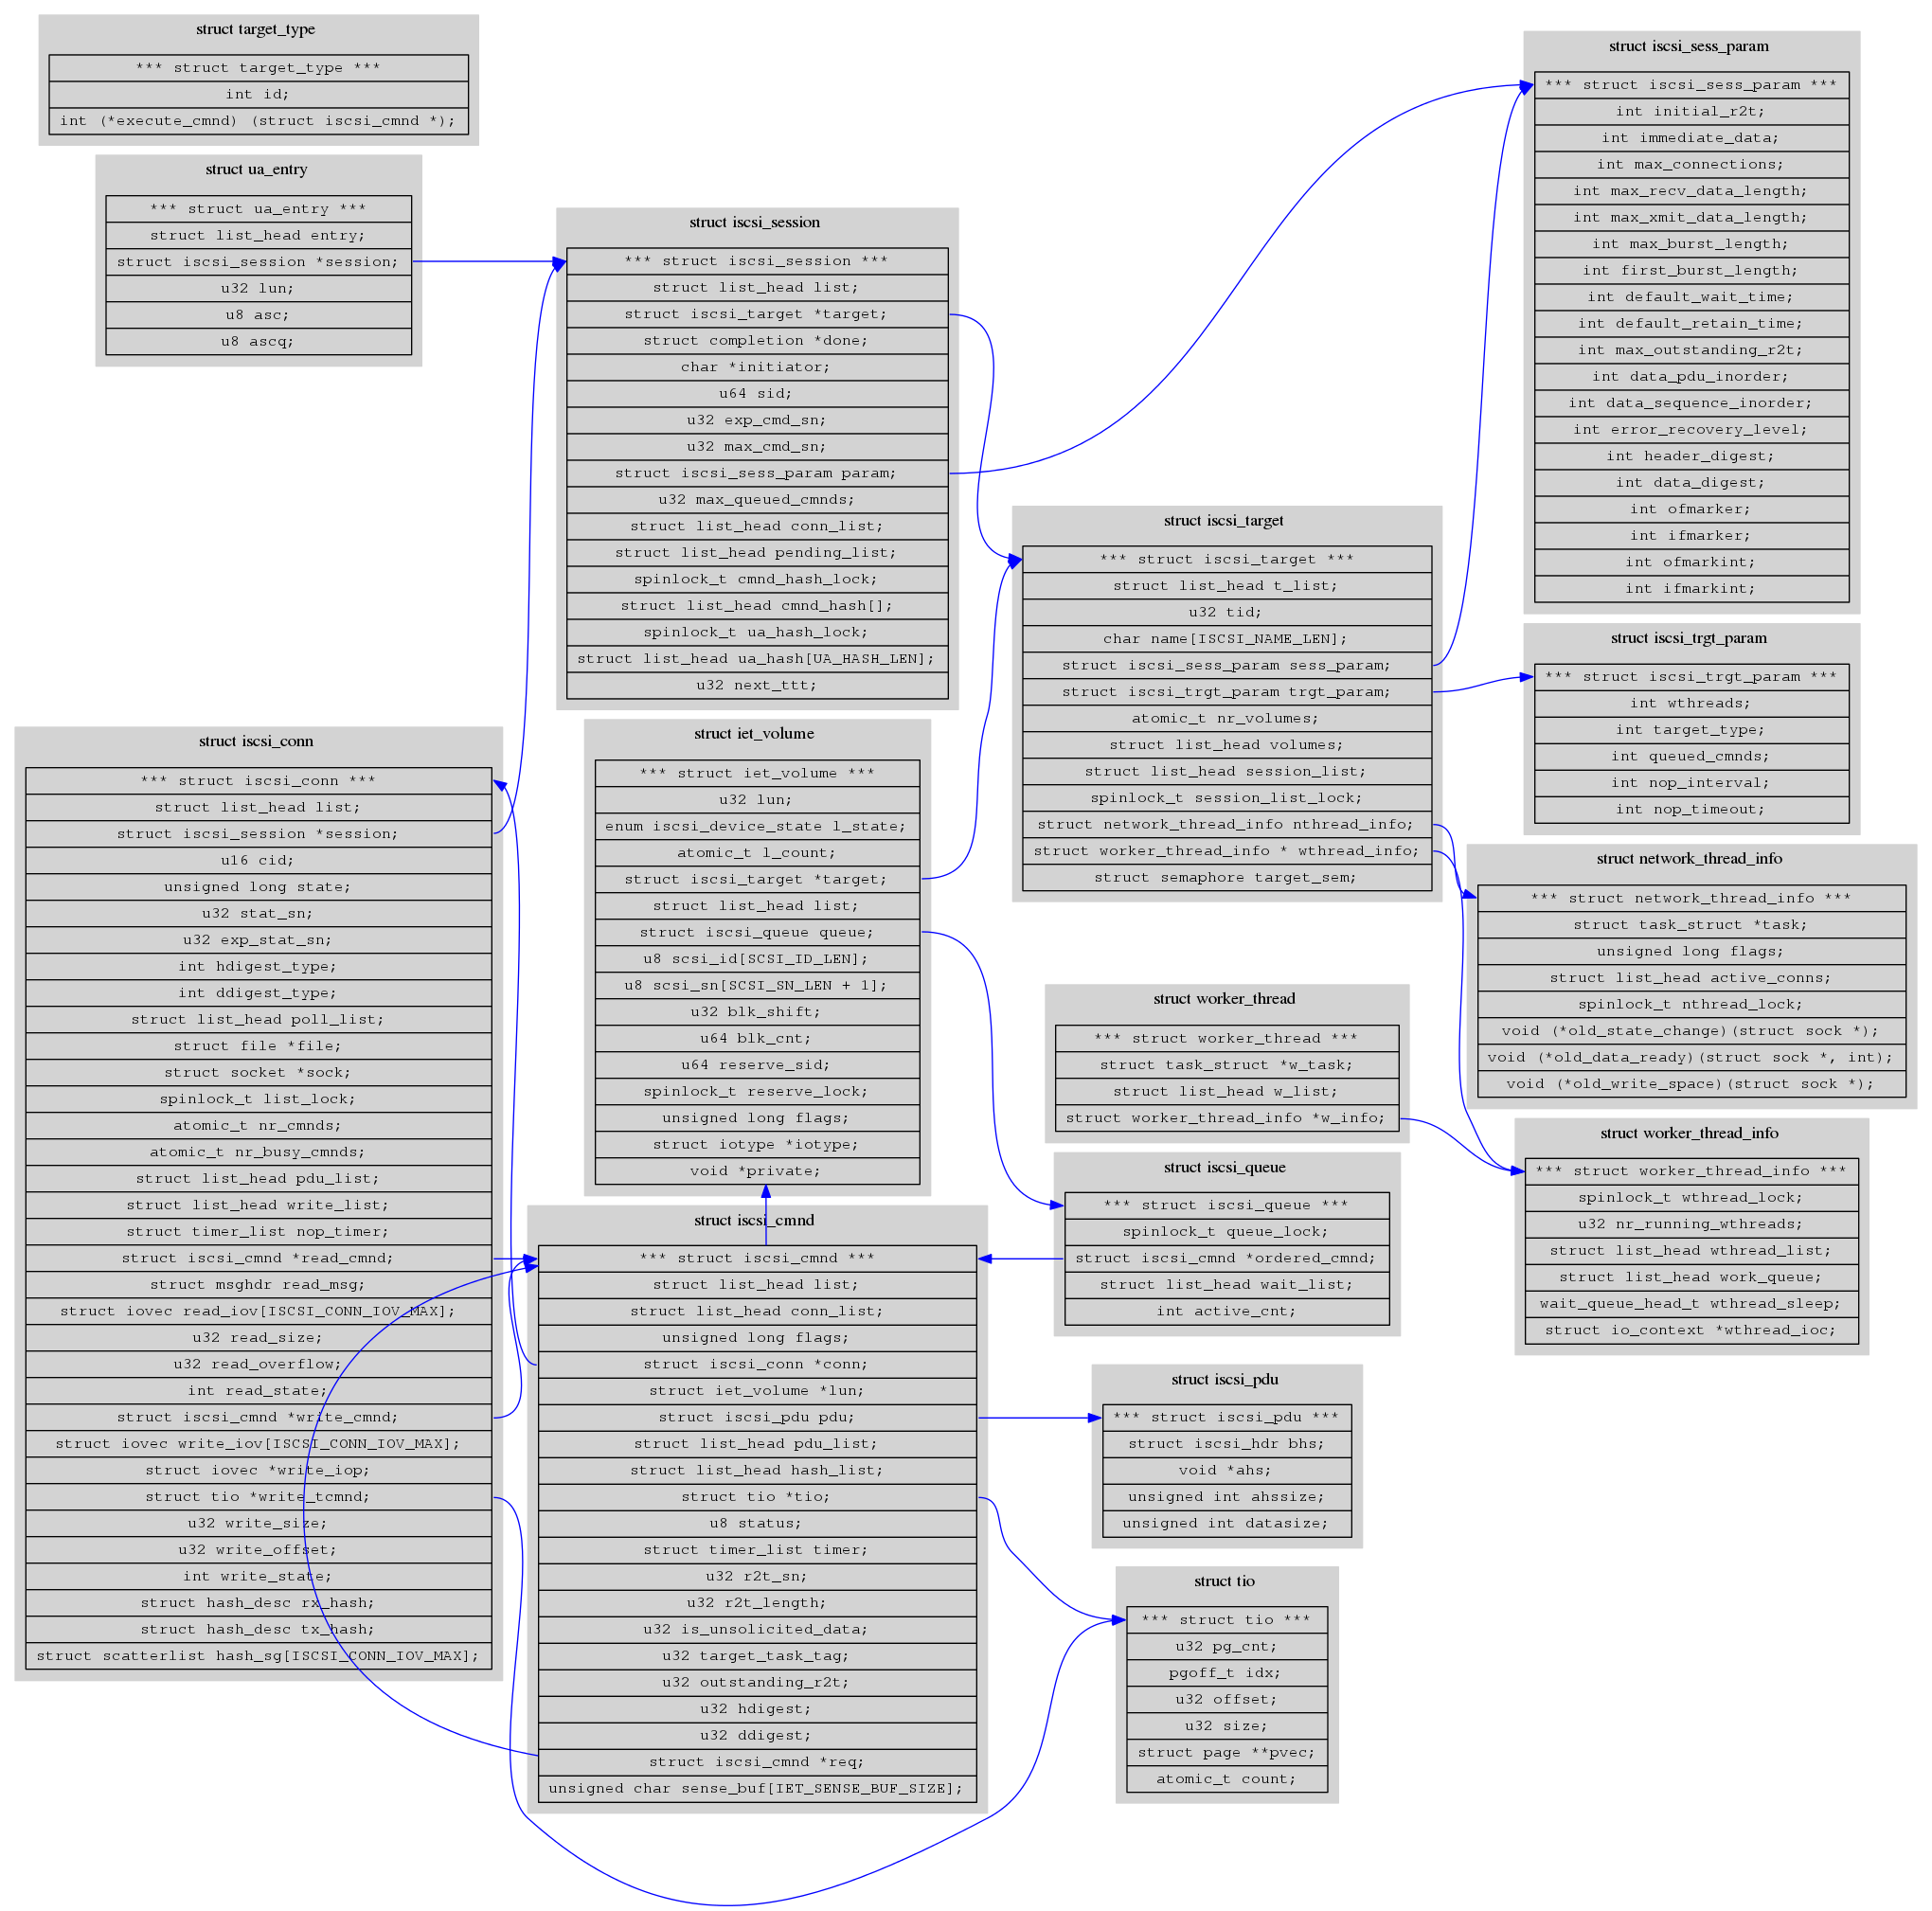
transfer iscsitarget-1.4.20/kernel/iscsi.h
[dennis@localhost kernel]$ pwd
/home/dennis/work/git/iet/src/iscsitarget-1.4.20/kernel
[dennis@localhost kernel]$ ds2img.py -i iscsi.h -f png -o iscsi.png
Done
[dennis@localhost kernel]$ ds2img.py -i iscsi.h -f svg -o iscsi.svg
Done
对于研发人员,存储技术的学习内容非常之多。我根据自己的理解,把它们大致分为以下8项内容:
存储研发人员成长大致可分为四个级别:
10000小时法则 (The 10,OOO Hour Rule),简单地说,任何人要在任何领域出类拔萃,脱颖
而出,都需要认真投入10000小时以上。10000小时是一个突破的临界点。以每天10个小时算
,10000小时相当于三年。也就是说,要做成功一件事情,你就要每天10小时投入,持续3年
。如果每天只有5小时,那么需要6年。如果每天3小时,则需要10年。因此,如果想成为存
储领域的专家,没有什么捷径可走,只有坚持学习、实践、思考。3年、5年、8年、10年后
,只要你仍在追求既定目标,定会有所成就。
“厚积而薄发”,与所有存储同行共勉!
###存储学习之路
领路人的作用很大,这个人可能是你做研究生的导师,或者工作中的tutor,或者是朋友、
同事。指点迷津,学习和研究过程中将少走很多弯路,经验的价值这在这里体现。如果你是
存储初学者,赶快去寻找你的领路人。当然自学成才的例子举不胜举,还是靠自己来做权衡。
学习存储的基础理论最直接的方法就是读书。相对于计算与网络技术,存储技术发展是相
对落后的,因此图书方面也要少很多,国内的更少,而且大多是翻译或改编的。我读过的国
内存储图书有:
网络资源也是学习存储的重要资源,而且能够很好地跟踪存储的最近发展动态。我常访问的URL有:
另外还有一些国际上存储会议,比如:
3、存储实践
大学中我们最缺是估计就是实践。实践可以帮助我们更深刻地理解和掌握理论,并且获得
将理论进行实现和应用的能力。实践有很多方式,比如自己动手进行存储软硬件的调试、存
储系统集优化改进、开发一些软件、阅读存储软件源码等等。实践这个东西,多多益善,尽
量找机会多做。源代码除了Linux kernel外,www.sourceforge.net是最好的去处,可以读
VFS、EXT2/3/4、Soft RAID、LVM、FDISK、NFS/CIFS、SCSI/iSCSI、FUSE、AFS、LUSTRE等等。
4、存储交流
牛人大多都是喜欢与人分享的,你也不要担心分享自己的东西,别人就超越你了。能把自
己的东西说得让别人明白,实际上对自己也是一个提升。物以类聚,人以群分。现在网络不
要太方便,找一群兴趣相投的人,多多交流,大家共同进步就何等的好事。而且同时可以建
立人脉,说不定哪天志同道合的人,就一起做共事或创业了。
学而不思则罔,思而不学则贻。当已经掌握了一些存储理论和实践后,我们可能会遇到发
展的瓶颈,需要选择一两个方向进行深入学习和研究。这样我们才能有精力去分析和思考理
论和技术上优点与不足,继而不断实践和思考。从而就有可能达到一个更高的层次,并且可
能会发现一些机会。
我们常常看到招聘信息上要求8-10年的相关工作经验。不管是失败还是成功的经验,对
未来的工作都很有意义,尤其是失败的经验,将大大提成功的几率。对搞存储的来说,最好
能找机会进入存储行业的公司或研究机构工作,这对经验的提升非常重要。因为这是正规军
,是适应市场用户需求的,而自己的学习和研究,都是出自自身需求的。如果你在公司工作
,或者自己创业,用户需求是做产品的根本出发点,这个意识要尽早培养。
熟悉历史,把握现在,预测未来。一旦我们对存储技术的过去和现在都非常熟悉和深入理
解,那么我们就有可能正确地对存储的未来趋势进行分析和预测,掌握先机和商机。这种人
是大牛,或许我们很难达到这个层次,但至少大牛提出很多新的观点和概念时,我们能很快
理解和认同。
创新是需要前提条件的,如果没有前面的学习、实践、思考,存储创新根本无从谈起。创
新可能是理论创新和技术创新,主要出发点就是要解决和改进目前理论或技术上存在的缺陷
与不足,这自然就要求我们对现有的东西非常熟悉。达到可以深入思考和寻求创新的层次,
我想大概规律性的东西就很少了。成功有时是需要点运气,但前期的功课是要做好的,成功
还是眷顾有充分准备的人的。
[dennis@localhost jni]$ cat Message.java
class Message
{
    public native int writeMessage(int type, char page_num, String content);
    public native int getCPUTemperature();
    public native int getHDDTemperature();

    static
    {
        System.loadLibrary("Message");
    }
}
[dennis@localhost jni]$ javac Message.java
[dennis@localhost jni]$ javah Message
[dennis@localhost jni]$ cat Message.h
/* DO NOT EDIT THIS FILE - it is machine generated */
#include <jni.h>
/* Header for class Message */

#ifndef _Included_Message
#define _Included_Message
#ifdef __cplusplus
extern "C" {
#endif
/*
 * Class:     Message
 * Method:    writeMessage
 * Signature: (ICLjava/lang/String;)I
 */
JNIEXPORT jint JNICALL Java_Message_writeMessage
  (JNIEnv *, jobject, jint, jchar, jstring);

/*
 * Class:     Message
 * Method:    getCPUTemperature
 * Signature: ()I
 */
JNIEXPORT jint JNICALL Java_Message_getCPUTemperature
  (JNIEnv *, jobject);

/*
 * Class:     Message
 * Method:    getHDDTemperature
 * Signature: ()I
 */
JNIEXPORT jint JNICALL Java_Message_getHDDTemperature
  (JNIEnv *, jobject);

#ifdef __cplusplus
}
#endif
#endif
[dennis@localhost jni]$ cat Message.c
#include <jni.h>
#include <stdio.h>
#include "Message.h"

int iCpu;
int iHdd;
int iMainboard;
int iFan;

void ReadTemperatureIni()
{
    iCpu = 37;
    iHdd = 28;
    iMainboard = 30;
    iFan = 3200;
    printf("call %s %s %d\n", __FILE__, __func__, __LINE__);
}

void send_msg(const short code, const char page, const char *content)
{
    printf("code=%d, page=%d, content=%s\n", code, page, content);
    printf("call %s %s %d\n", __FILE__, __func__, __LINE__);
}

JNIEXPORT jint JNICALL Java_Message_getCPUTemperature(JNIEnv *env, jobject obj)
{
    ReadTemperatureIni();
    return iCpu;
}

JNIEXPORT jint JNICALL Java_Message_getHDDTemperature(JNIEnv *env, jobject obj)
{
    ReadTemperatureIni();
    return iHdd;
}

JNIEXPORT jint JNICALL Java_Message_getMainboardTemperature (JNIEnv *env, jobject obj)
{
    ReadTemperatureIni();
    return iMainboard;
}

JNIEXPORT jint JNICALL Java_Message_getCPUFanSpeed (JNIEnv *env, jobject obj)
{
    ReadTemperatureIni();
    return iFan;
}


JNIEXPORT jint JNICALL Java_Message_writeMessage
(JNIEnv *env, jobject obj, jint type, jchar page_num, jstring content)
{
    /* c   code use: (*env)-> */
    /* c++ code use: env->    */
    const jbyte *str = (const jbyte *)(*env)->GetStringUTFChars(env,content,JNI_FALSE);
    send_msg(type, page_num, (const char*)str);
    (*env)->ReleaseStringUTFChars(env,content,(const char *)str);

    return 0;
}
[dennis@localhost jni]$ cat Makefile
CC = gcc
CFLAGS = -Wall -shared -fPIC
# change the directory for YOUR OS
JAVA_INC = -I/usr/lib/jvm/java-1.7.0-openjdk-1.7.0.60-2.5.0.1.fc20.x86_64/include/  \
           -I/usr/lib/jvm/java-1.7.0-openjdk-1.7.0.60-2.5.0.1.fc20.x86_64/include/linux
TARGET = libMessage.so

all:$(TARGET)

libMessage.so: Message.c
    $(CC) $(CFLAGS) $(JAVA_INC) -o $@ $^

.PHONY:clean
clean:
    rm -f *.class $(TARGET)
[dennis@localhost jni]$ make
gcc  -Wall -shared -fPIC -I/usr/lib/jvm/java-1.7.0-openjdk-1.7.0.60-2.5.0.1.fc20.x86_64/include/ -I/usr/lib/jvm/java-1.7.0-openjdk-1.7.0.60-2.5.0.1.fc20.x86_64/include/linux  -o libMessage.so Message.c
[dennis@localhost jni]$ su -c 'cp libMessage.so /usr/lib64'
[dennis@localhost jni]$ cat Test.java
public class Test
{
     public static void main(String argv[])
     {
         new Test();
     }

     public Test()
     {
         char type = 0x1F;
         char page = 1;
         String content = "Test Message";
         int ret = new Message().writeMessage(type, page, content);

         int cpu=new Message().getCPUTemperature();
         System.out.println(cpu);

         int hdd=new Message().getHDDTemperature();
         System.out.println(hdd);
     }
}
[dennis@localhost jni]$ javac Test.java
[dennis@localhost jni]$ java Test
code=31, page=1, content=Test Message
call Message.c send_msg 22
call Message.c ReadTemperatureIni 16
37
call Message.c ReadTemperatureIni 16
28
#################################################################
# Makefile
# For JNI project on Fedora x86_64 release 20
# Create by Dennis
# 2014-07-18
#
# HOW TO MAKE A JNI PROJECT
# 1. create Message.java, define native function and load library
# 2. run 'javac Message.java' to generate Message.class
# 3. run 'javah Message' to generate Message.h
# 4. create Message.c, and implement function
# 5. start to compile file to dynamic library, then copy the *.so
#    file to /usr/lib64/
# 6. create Test.java, a sample code to test interface function
# 7. run 'javac Test.java' to generate Test.class
# 7. run 'java Test'
#################################################################
CC = gcc
JAVAC = javac
CFLAGS = -Wall -shared -fPIC
# change the directory for YOUR OS
JAVA_INC = -I/usr/lib/jvm/java-1.7.0-openjdk-1.7.0.60-2.5.0.1.fc20.x86_64/include/  \
           -I/usr/lib/jvm/java-1.7.0-openjdk-1.7.0.60-2.5.0.1.fc20.x86_64/include/linux
TARGET = libMessage.so Test.class

all:$(TARGET)

libMessage.so: Message.c
    $(CC) $(CFLAGS) $(JAVA_INC) -o $@ $^

Test.class:
    $(JAVAC) Test.java

.PHONY:clean
clean:
    rm -f *.class $(TARGET)
The Intelligent Platform Management Interface (IPMI) is a standardized computer
system interface used by system administrators for out-of-band management of
computer systems and monitoring of their operation. It is a way to manage a
computer that may be powered off or otherwise unresponsive by using a network
connection to the hardware rather than to an operating system or login shell.

Use lm-sensor?
[root@localhost ~]# sensors
acpitz-virtual-0
Adapter: Virtual device
temp1:       +27.8°C  (crit = +106.0°C)
temp2:       +29.8°C  (crit = +106.0°C)

coretemp-isa-0000
Adapter: ISA adapter
Physical id 0: +35.0°C  (high = +85.0°C, crit = +105.0°C)
Core 0:        +32.0°C  (high = +85.0°C, crit = +105.0°C)
Core 1:        +31.0°C  (high = +85.0°C, crit = +105.0°C)
Use dmidecode?
On Centos 6.5
[root@localhost ~]# yum install OpenIPMI -y
[root@localhost ~]# yum install ipmitool -y
[root@localhost ~]# chkconfig ipmi on
[root@localhost ~]# service ipmi start
Starting ipmi drivers:                                     [  OK  ]
[root@localhost ~]# ls -l /dev/ipmi*
crw-rw----. 1 root root 245, 0 Feb  5 14:18 /dev/ipmi0
[root@localhost ~]# lsmod | grep ipmi
ipmi_devintf            7729  0
[root@localhost ~]# modinfo ipmi_devintf
filename:       /lib/modules/2.6.32-431.el6.x86_64/kernel/drivers/char/ipmi/ipmi_devintf.ko
alias:          platform:ipmi_si
description:    Linux device interface for the IPMI message handler.
author:         Corey Minyard <minyard@mvista.com>
license:        GPL
srcversion:     592518D3E7F47DFC4EBEC9F
depends:
vermagic:       2.6.32-431.el6.x86_64 SMP mod_unload modversions
parm:           ipmi_major:Sets the major number of the IPMI device.  By default, or if you set it to zero, it will choose the next available device.  Setting it to -1 will disable the interface.  Other values will set the major device number to that value. (int)
[root@localhost ~]#
To check firmware version
[root@localhost ~]# ipmitool mc info
Device ID                 : 20
Device Revision           : 1
Firmware Revision         : 0.8
IPMI Version              : 2.0
Manufacturer ID           : 9091
Manufacturer Name         : Unknown (0x2383)
Product ID                : 289 (0x0121)
Product Name              : Unknown (0x121)
Device Available          : yes
Provides Device SDRs      : no
Additional Device Support :
    Sensor Device
    SDR Repository Device
    SEL Device
    FRU Inventory Device
    IPMB Event Receiver
    Chassis Device
Aux Firmware Rev Info     :
    0x00
    0x37
    0x00
    0x00
Show sensor output
[root@localhost ~]# ipmitool sdr list
CPU0_TEMP        | 25 degrees C      | ok
VCORE_CPU0       | 0.83 Volts        | ok
+1.5V_DDR3       | 1.52 Volts        | ok
PCH              | 1.04 Volts        | ok
+3.3V            | 3.42 Volts        | ok
+5V              | 5.14 Volts        | ok
+5VSB            | 5.07 Volts        | ok
VBAT             | 3.34 Volts        | ok
+12V_MONITOR     | 12.40 Volts       | ok
THERMAL01        | 35 degrees C      | ok
THERMAL02        | 31 degrees C      | ok
CPU_FAN1         | 5900 RPM          | ok
SYS_FAN1         | 0 RPM             | nr
SYS_FAN2         | 0 RPM             | nr
SYS_FAN3         | 0 RPM             | nr
Watchdog         | Not Readable      | ns
[root@localhost ~]# ipmitool sdr type list
Sensor Types:
    Temperature                 Voltage
    Current                     Fan
    Physical Security           Platform Security
    Processor                   Power Supply
    Power Unit                  Cooling Device
    Other                       Memory
    Drive Slot / Bay            POST Memory Resize
    System Firmwares            Event Logging Disabled
    Watchdog                    System Event
    Critical Interrupt          Button
    Module / Board              Microcontroller
    Add-in Card                 Chassis
    Chip Set                    Other FRU
    Cable / Interconnect        Terminator
    System Boot Initiated       Boot Error
    OS Boot                     OS Critical Stop
    Slot / Connector            System ACPI Power State
    Watchdog                    Platform Alert
    Entity Presence             Monitor ASIC
    LAN                         Management Subsystem Health
    Battery                     Session Audit
    Version Change              FRU State
[root@localhost ~]# ipmitool sdr type Fan
CPU_FAN1         | 31h | ok  |  7.1 | 5900 RPM
SYS_FAN1         | 32h | lnr |  7.2 | 0 RPM
SYS_FAN2         | 33h | lnr |  7.5 | 0 RPM
SYS_FAN3         | 34h | lnr |  7.6 | 0 RPM
[root@localhost ~]# ipmitool sdr type Temperature
CPU0_TEMP        | 21h | ok  |  7.1 | 25 degrees C
THERMAL01        | 23h | ok  |  7.1 | 35 degrees C
THERMAL02        | 24h | ok  |  7.1 | 31 degrees C
Display/reset password for default root user (userid ‘2’)
ipmitool user list 1
ipmitool user set password 2 <new_password>
Display/configure lan settings
ipmitool lan print 1
ipmitool lan set 1 ipsrc [ static | dhcp ]
ipmitool lan set 1 ipaddr 192.168.1.101
ipmitool lan set 1 netmask 255.255.255.0
ipmitool lan set 1 defgw ipaddr 192.168.1.254
gcc myapp.c -L/home/fred/lib -I/home/fred/include -lnew -o myapp

gcc cursesapp.c -lncurse -static -o cursesapp

/*
 * pisqrt.c - Calculate the square of PI 100,000,000
 * times
 */
#include <stdio.h>
#include <math.h>

int main(void)
{
    double pi = M_PI; /* Defined in <math.h> */
    double pisqrt;
    long i;

    for (i=0; i<10000000; ++i) {
        pisqrt = sqrt(pi);
    }

    return 0;
}
auto variable
$@
$<
$^
$?
$(@D)
$(@F)
configure.in
AC_INIT(unique_file_in_source_dir)
AC_OUTPUT([file...[,extra_cmds[,init_cmds]]])

AC_INIT
    Test program
    Test function library
    Test header
    Test type defined
    Test structure
    Test compile
    Test library function
    Test system call
AC_OUTPUT

autoscan
ifnames
diff
patch

diff -c sigrot.1 sigrot.2 > sigrot.path
patch -p0 < sigrot.patch
#include <assert.h>
void assert (int expression);
__LINE__
__FILE__
__FUNCTION__
stdlib.h    void abort(void);
stdlib.h    void exit(int status);
stdlib.h    int atexit(void (*fcn) (void));
stdio.h        void perror(const char *s);
string.h    char *strerror(int errnum);
errno.h        int errno;

void clearerr(FILE *stream);
int feof(FILE *stream);
int ferror(FILE *stream);
klogd
syslogd

#include <syslog.h>
void syslog(int priority, char *format, ...);

syslog(LOG_WARNING | LOG_USER, "unable to open file %s *** %m\n", fname);

for shell:
logger [-s] [-f file] [-p pri] [-t tag] [-u socket] [message ...]
nm [options] file
ar {dmpgrtx} [member] archive files ...
ldd [options] file
ldconfig [options] [libs]

gcc -fPIC -g -c liberrr.c -o liberr.o
gcc -g -shared -Wl,-soname,liberr.so -o liberr.so.1.0.0 liberr.o -lc
ln -s liberr.so.1.0.0 liberr.so.1

void *dlopen(const char *filename, int flag);
void *dlsym(void *handle, char *symbol);
const char *dlerror(void);
int dlclose(void *handle);

gcc -g -Wall dltest.c -o dltest -ldl
open
create
close
read
write
ftruncate
lseek
fsync
fstat
fchown
fchmod
flock
fcntl
dup
dup2
slect
ioctl

fopen
freopen
fclose

feof
ferror
clearer
fileno

printf
fprintf
sprintf
snprintf

vprintf
vfprintf
vsprintf
vsnprintf

scanf
fscanf
sscanf

vscanf
vsscanf
vfscanf

fseek
ftell
fgetpos
fsetpos
rewind

fflush
setbuf
setbuffer
setlinebuf
setvbuf

remove
rename

tmpfile
tmpnam

mkstemp

getcwd
chdir
fchdir

mkdir
rmdir

opendir
readdir
rewinddir
closedir
system
fork
exec
popen
pclose

wait
waitpid

exit
abort
kill

alarm
pause

sigemptyset
sigfillset
sigaddset
sigdelset
sigismember

sigprocmask
sigaction
sgpending

sched_setscheduler
sched_getscheduler
sched_get_priority_max
sched_get_priority_min
getpriority
setpriority
nice
_clone

pthread_create
pthread_exit
pthread_join
pthread_detach
pthread_atfork
pthread_cancel
pthread_setcancelstate
pthread_setcanceltype
pthread_testcancel

pthread_cleanup_push
pthread_cleanup_pop
pthread_cleanup_push_defer_np
pthread_cleanup_pop_restore_np

pthread_cond_signal
pthread_cond_broadcast
pthread_cond_wait
pthread_cond_timewait
pthread_cond_destroy

pthread_equal

pthread_attr_

pthread_mutex_
malloc
calloc
realloc
free

mmap
mumap
msync
mprotect
mlock
munlock
mlockall
munlockall
pipe
popen
pclose

mkfifo

shmget
shmat
shmdt

msgget
msgsnd
msgrcv
msgctl

semget
semop
semctl

setsid

openlog
closelog
syslog
socket
bind
listen
connect
accept
read
write
recv_from
send_to

sendfile
close

netstat
tcpdump

multicast
terminal

ncurses

x windows

GTK+ GUI

Qt GUI

OpenGL Mesa 3D

From http://www.wikihow.com/Learn-Morse-Code
The Morse Code was developed by Samuel F.B. Morse in 1844. Even after more than
160 years, it is still used today, especially by amateur radio operators. The
code can be sent quickly over the telegraph, and is also useful for emergency
signaling (SOS) with a radio, mirror, or flashlight, and even for people with
severe disabilities to communicate. In order to master Morse code, however, you
need to approach it like a new language.
Listen carefully to slow morse code recordings. What you’re listening for is a
combination of dots and dashes (also referred to as dits and dahs). A dit is a
short beep, while a dah is a longer beep (three times longer). Every letter is
separated by a short pause, and every word is separated by a longer pause (three
times longer).
Refer to a copy of the Morse Code alphabet (as seen at the bottom of the page).
You can use a basic chart such as the one shown at right (click to enlarge), or
you can use a more advanced chart which includes punctuation, abbreviated phrases,
prosigns and Q Codes.1 Match up what you heard to the letters in the alphabet.
What does it say? Were you correct?
Some people find it easier to learn by writing down the letter with dots/periods
and dashes, and comparing it to a chart such as the one shown; others say this
creates an additional step that will only slow you down in learning Morse code.
Do whatever feels more comfortable for you. If you choose to avoid interpreting
written dots and dashes, you can use a pronunciation chart which lists the sounds
of the Morse Code signals, as if you were hearing them, rather than the dash and
dot symbols.2
Sound it out. Practice translating basic words and sentences into Morse code. In
the beginning, you can write it down, then sound it out, but eventually you’ll
need to go straight to sounding it out. For example, the word “cat”. Write it down:
-.-. .- -
then transmit the word (you can use the buttons on a mobile phone, or beep
vocally – the latter will probably help your mind pick up the code faster). To
pronounce morse code, dit is pronounced di with a short i sound and a silent t.
Dah is pronounced with a short a sound. So cat is pronounced dah-di-dah-di di-dah
dah. Once you feel comfortable with that, pick up a children’s book and try to
transmit the content in Morse code without writing anything down. Record yourself
and play it back later to see if you were correct.
Memorize the easiest letters first.3 A single dah is a “T” and a single dit is
an “E”. Next, a dah-dah is an “M” and a dit-dit is an “I”. Memorize the letters
for 3 and 4 dits and dahs in a row. Once you’ve got those down, start memorizing
the combinations: dit-dah, dit-dah-dah, dit-dah-dah-dah, and so on. Leave the more
complex combinations for last. Fortunately, this includes some less commonly used
letters (like Q, Y, X, and V) so when you get to this point, focus on the more
commonly used letters first. Notice how E and T have the shortest symbols, and
how K, Z, Q, and X have long symbols.
Make associations. For every letter, think of a memorable “sound alike”. Here’s
an example: The letter “C” is dah-dit-dah-dit (long short long short). Can you
think of a word that starts with that letter, and sounds like the Morse
pronunciation? How about catastrophic, which has an emphasis on the first and
third syllable, and begins with a “c”? Or how about dah-dit, which is Morse code
for “N”? How about nanny? This will be harder for words that end in several “dahs”
in a row, since many words in the English language alternate emphasis between
syllables, and usually do not end with an emphasis, but you could use sentences,
too. There are also existing Morse code mnemonics that have been around for many
years; you might be able to find them online, or purchase them.4
Have fun with it. Want to get your friends into it? Learn how to blink code. That
way, you can give an SOS blink when your friend just introduced you to a rather
unpleasant blind date, for instance. Use written Morse code to write secret notes,
or keep a diary in Morse, or tell dirty jokes without anyone knowing. Give someone
a Morse code greeting card. Say “I love you” in Morse code (how romantic!).
Whatever floats your boat, find a way to do it in Morse code, and you’ll learn
it much faster.
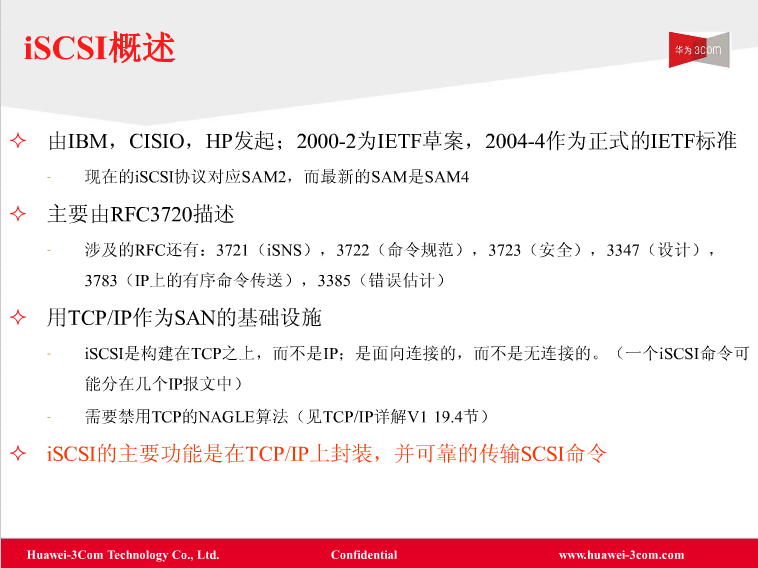
iSCSI是由IEETF开发的网络存储标准,目的是为了用IP协议将存储设备连接在一起。
iSCSI HBA卡连接方式(硬iSCSI):
在主机上安装专业的iSCSI HBA适配卡,从而实现主机与交换机之间、主机与存储之间的
高效数据交换。传输性能好,价格高。
以太网卡+initiator软件方式(软iSCSI):
服务器、工作站等主机使用标准的以太网卡,通过以太网线直接与以太网交换机连接,
iSCSI存储也通过以太网线连接到以太网交换机上,或直接连接到主机的以太网卡上。
在主机上安装Initiator软件,Initiator软件可以将以太网卡虚拟为iSCSI卡,接受和发
送iSCSI数据报文,从而实现主机和iSCSI设备之间的iSCSI协议和TCP/IP协议传输功能。
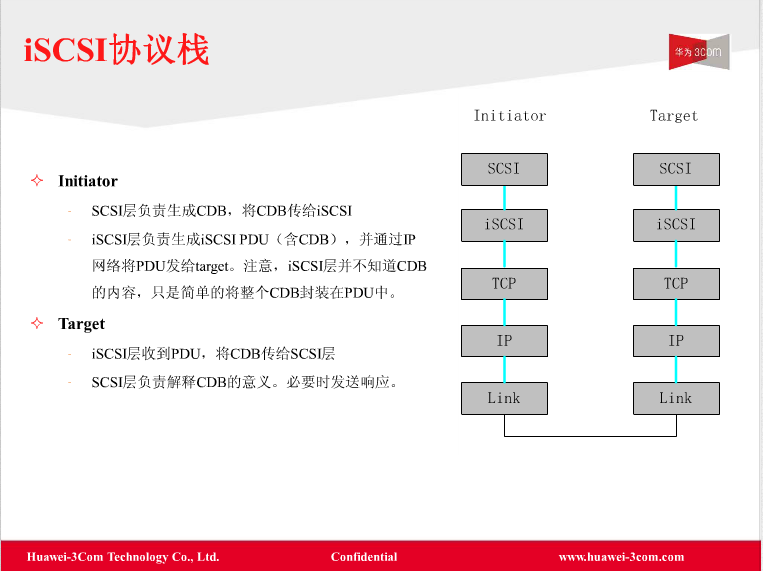
The iSCSI target consists of a kernel module (iscsi_trgt.ko) , daemon
(ietd) and control utility (ietadm).
makemake kernel or make usrmake [KSRC=<kernel-src>] installInstall individual components:
make [KSRC=
make [KSRC=
make [KSRC=
make [KSRC=
ietd and ietadm will be install in /usr/sbin
iscsi-target was install in /etc/init.d/
ietd.conf and initiators.{allow,denny} were install in /etc
start stop
/etc/init.d/iscsi-target start
/etc/init.d/iscsi-target stop
iet主要配置
主要包括以下配置文件
/etc/ietd.conf :iet的主配置文件
/etc/initiators.allow:控制initiator对target的访问权限
/etc/initiators.deny:控制initiator对target的访问权限
/etc/targets.allow:控制不同target的被访问权限
通过/etc/ietd.conf, iet实现iSCSI Target的基本功能.
iSCSI Target的命名,命名在同一子网内应该是唯一。
Target  target名称
其中:
target 名称:是iSCSI Target名称。一般iSCSI Target命名采用
    “iqn.yyyy-mm.<reversed domain name>: identifier 识别代号”的格式。
将块设备、文件、LVM卷、RAID卷作为块设备映射给iSCSI initiator使用。
Lun  <lunID> Path=<device>,Type=fileio|blockio[,IOMode=(wb|ro)]
其中:
<lunID>:是Lun的编号从0开始,最大2^14-1。
Path=<device>:指定块设备。可以使用dd命令生成一个文件。
Type=fileio|blockio:指定块设备类型,分区及dd命令生成的文件使用fileio类型;
    LVM卷、RAID卷使用blockio类型。
IOMode=(wb|ro):指定iSCSI initiator允许的操作,wb表示可读写;ro表示只读。
配置完后重起iscsi-target,initiator即可连接使用.
iet其它配置
通过命令方式配置的iSCSI Target在重启后会失效。
添加一个新的Target。其中[id]为数字却必须唯一,Name需自定义,也要唯一。
ietadm --op new --tid=[id] --params Name=iqn.zqin.example

添加一个新的lun。其中[id]必须是一个已存在的tid号,[lun]从0开始。
ietadm --op new --tid=[id] --lun=[lun] --params Path=/path/exported/file,Type=fileio
iet常用命令
查看当前iSCSI Target清单。
cat /proc/net/iet/volume

查看当前服务器iSCSI Target服务以及连接状态命令
cat /proc/net/iet/sessions

停止某个Target 的某个 Connection 的连接。
ietadm --op delete --tid=2 --sid=562950876233792 --cid=1  && ietadm --op delete --tid=2

停止所有Target 的连接。
ietadm --op delete

删除某个Target (已经没有 Session 连接的)。
ietadm --op delete --tid= 1
完整操作如下:
[root@ ~]# dd if=/dev/zero of=/root/iscsi.disk bs=1M count=1024
1024+0 records in
1024+0 records out
1073741824 bytes (1.1 GB) copied, 9.30143 s, 115 MB/s
[root@ ~]# echo "Target iqn.2014-06.com.matrix:storage.515.disk" >> /etc/ietd.conf
[root@ ~]# echo "Lun 0 Path=/root/iscsi.disk,Type=fileio">>/etc/ietd.conf
[root@ ~]# echo "Alias lun0">>/etc/ietd.conf
[root@ ~]# cat /etc/ietd.conf
Target iqn.2014-06.com.matrix:storage.515.disk
Lun 0 Path=/root/iscsi.disk,Type=fileio
Alias lun0
[root@ ~]# echo "iqn.2014-06.com.matrix:storage.515.disk 172.16.*.*">> /etc/initiators.allow
[root@ ~]# cat /etc/initiators.allow
iqn.2014-06.com.matrix:storage.515.disk 172.16.*.*
[root@ ~]# netstat -tulpn | grep 3260
tcp     0      0 172.16.110.10:3260   0.0.0.0:*  LISTEN  12147/ietd
[root@ ~]# cat /proc/net/iet/session
tid:1 name:iqn.2014-06.com.matrix:storage.515.disk
[root@ ~]# cat /proc/net/iet/volume
tid:1 name:iqn.2014-06.com.matrix:storage.515.disk
    lun:0 state:0 iotype:fileio iomode:wt blocks:2097152 blocksize:512 path:/root/iscsi.disk

[root@ ~]# /etc/init.d/iscsi-target restart
Stopping iSCSI Target:                                     [  OK  ]
Starting iSCSI Target: FATAL: Error inserting crc32c_intel (/lib/modules/2.6
.32-279.el6.x86_64/kernel/arch/x86/crypto/crc32c-intel.ko): No such device
                                                           [  OK  ]
上面的错误是因为centos 6.3, kernel 2.6.32-279.el6.x86_64, 该版本已不需要
crc32c_intel.ko模块,可以过屏蔽脚本/etc/init.d/iscsi-target中的modprobe -q crc32来解决该错误信息。
[root@ ~]# /etc/init.d/iscsi-target restart
Stopping iSCSI Target:                                     [  OK  ]
Starting iSCSI Target:                                     [  OK  ]
[root@ ~]# service iscsi-target status
iSCSI Target (pid 12147) is running...
安装 yum install iscsi-initiator-utils
iscsiadm是基于命令行的iscsi管理工具,提供对iscsi节点、会话、连接以及发现记录的操作。
涉及的主要操作如下:
设置CHAP, vim /etc/iscsi/iscsid.conf, 或这使用下面的命令设置:
[root@localhost ~]# iscsiadm -m node -T iqn.2007-10.lio.com:dg3.liolv1 -p 172.16.130.100 -o update –name node.session.auth.authmethod –value=CHAP
[root@localhost ~]# iscsiadm -m node -T iqn.2007-10.lio.com:dg3.liolv1 -p 172.16.130.100 -o update –name node.session.auth.username –value=alan
[root@localhost ~]# iscsiadm -m node -T iqn.2007-10.lio.com:dg3.liolv1 -p 172.16.130.100 -o update –name node.session.auth.password –value=123555
[root@localhost ~]# iscsiadm -m node -T iqn.2007-10.lio.com:dg3.liolv1 -p 172.16.130.100 –login
注意:
要先使用发现discovery,然后才能登陆login,否则会出现错误“iscsiadm: No records found”
下面是详细的操作:(注意:括号内容为注释说明)
[root@localhost dennis]# fdisk -l

Disk /dev/sda: 149 GiB, 160000000000 bytes, 312500000 sectors
Units: sectors of 1 * 512 = 512 bytes
Sector size (logical/physical): 512 bytes / 512 bytes
I/O size (minimum/optimal): 512 bytes / 512 bytes
Disklabel type: dos
Disk identifier: 0x00007f87

Device    Boot     Start       End    Blocks  Id System
/dev/sda1 *         2048   1026047    512000  83 Linux
/dev/sda2        1026048 312498175 155736064  8e Linux LVM

(...此处省略不必要的内容...)
[root@localhost dennis]# iscsiadm -m discovery -t st -p 172.16.110.10
172.16.110.10:3260,1 iqn.2014-06.com.matrix:storage.515.disk
[root@localhost dennis]# iscsiadm -m node -T iqn.2014-06.com.matrix:storage.515.disk -p 172.16.110.10 -l
Logging in to [iface: default, target: iqn.2014-06.com.matrix:storage.515.disk, portal: 172.16.110.10,3260] (multiple)
Login to [iface: default, target: iqn.2014-06.com.matrix:storage.515.disk, portal: 172.16.110.10,3260] successful.
[root@localhost dennis]# fdisk -l

Disk /dev/sda: 149 GiB, 160000000000 bytes, 312500000 sectors
Units: sectors of 1 * 512 = 512 bytes
Sector size (logical/physical): 512 bytes / 512 bytes
I/O size (minimum/optimal): 512 bytes / 512 bytes
Disklabel type: dos
Disk identifier: 0x00007f87

Device    Boot     Start       End    Blocks  Id System
/dev/sda1 *         2048   1026047    512000  83 Linux
/dev/sda2        1026048 312498175 155736064  8e Linux LVM

(...此处省略不必要的内容...)
(成功连接后,多出一块磁盘/dev/sdb,大小刚好是前面dd创建的1G文件)
Disk /dev/sdb: 1 GiB, 1073741824 bytes, 2097152 sectors
Units: sectors of 1 * 512 = 512 bytes
Sector size (logical/physical): 512 bytes / 512 bytes
I/O size (minimum/optimal): 512 bytes / 512 bytes

[root@localhost dennis]# iscsiadm -m node -T iqn.2014-06.com.matrix:storage.515.disk -p 172.16.110.10 -u
Logging out of session [sid: 1, target: iqn.2014-06.com.matrix:storage.515.disk, portal: 172.16.110.10,3260]
Logout of [sid: 1, target: iqn.2014-06.com.matrix:storage.515.disk, portal: 172.16.110.10,3260] successful.
[root@localhost dennis]#
连接成功后,iet端显示如下:
[root@ ~]# cat /proc/net/iet/session
tid:1 name:iqn.2014-06.com.matrix:storage.515.disk
    sid:562949990973952 initiator:iqn.1994-05.com.redhat:7d366003913
        cid:0 ip:172.16.50.39 state:active hd:none dd:none    tip:172.16.110.10
第一次连接时,磁盘是还没有分区化, 磁盘分区:
[root@localhost dennis]# fdisk /dev/sdb

Welcome to fdisk (util-linux 2.24.2).
Changes will remain in memory only, until you decide to write them.
Be careful before using the write command.

Device does not contain a recognized partition table.

Created a new DOS disklabel with disk identifier 0xf1eb4d09.

Command (m for help): m

Help:

  DOS (MBR)
   a   toggle a bootable flag
   b   edit nested BSD disklabel
   c   toggle the dos compatibility flag

  Generic
   d   delete a partition
   l   list known partition types
   n   add a new partition
   p   print the partition table
   t   change a partition type
   v   verify the partition table

  Misc
   m   print this menu
   u   change display/entry units
   x   extra functionality (experts only)

  Save & Exit
   w   write table to disk and exit
   q   quit without saving changes

  Create a new label
   g   create a new empty GPT partition table
   G   create a new empty SGI (IRIX) partition table
   o   create a new empty DOS partition table
   s   create a new empty Sun partition table


Command (m for help): g
Created a new GPT disklabel (GUID: 22C002F1-D9F7-4E4C-8F89-9EFEBB971A1D).

Command (m for help): n
Partition number (1-128, default 1): 1
First sector (2048-2097118, default 2048):
Last sector, +sectors or +size{K,M,G,T,P} (2048-2097118, default 2097118):

Created a new partition 1 of type 'Linux filesystem' and of size 1023 MiB.

Command (m for help): p
Disk /dev/sdb: 1 GiB, 1073741824 bytes, 2097152 sectors
Units: sectors of 1 * 512 = 512 bytes
Sector size (logical/physical): 512 bytes / 512 bytes
I/O size (minimum/optimal): 512 bytes / 512 bytes
Disklabel type: gpt
Disk identifier: 22C002F1-D9F7-4E4C-8F89-9EFEBB971A1D

Device    Start          End   Size Type
/dev/sdb1  2048      2097118  1023M Linux filesystem

Command (m for help): w

The partition table has been altered.
Calling ioctl() to re-read partition table.
Syncing disks.

[root@localhost dennis]# fdisk -l

Disk /dev/sda: 149 GiB, 160000000000 bytes, 312500000 sectors
Units: sectors of 1 * 512 = 512 bytes
Sector size (logical/physical): 512 bytes / 512 bytes
I/O size (minimum/optimal): 512 bytes / 512 bytes
Disklabel type: dos
Disk identifier: 0x00007f87

Device    Boot     Start       End    Blocks  Id System
/dev/sda1 *         2048   1026047    512000  83 Linux
/dev/sda2        1026048 312498175 155736064  8e Linux LVM

(...此处省略不必要的内容...)

Disk /dev/sdb: 1 GiB, 1073741824 bytes, 2097152 sectors
Units: sectors of 1 * 512 = 512 bytes
Sector size (logical/physical): 512 bytes / 512 bytes
I/O size (minimum/optimal): 512 bytes / 512 bytes
Disklabel type: gpt
Disk identifier: 22C002F1-D9F7-4E4C-8F89-9EFEBB971A1D

Device    Start          End   Size Type
/dev/sdb1  2048      2097118  1023M Linux filesystem
分区完毕后,对磁盘该分区进行格式化:
[root@localhost dennis]# mkfs.ext3 /dev/sdb1
mke2fs 1.42.8 (20-Jun-2013)
Filesystem label=
OS type: Linux
Block size=4096 (log=2)
Fragment size=4096 (log=2)
Stride=0 blocks, Stripe width=0 blocks
65536 inodes, 261883 blocks
13094 blocks (5.00%) reserved for the super user
First data block=0
Maximum filesystem blocks=268435456
8 block groups
32768 blocks per group, 32768 fragments per group
8192 inodes per group
Superblock backups stored on blocks:
    32768, 98304, 163840, 229376

Allocating group tables: done
Writing inode tables: done
Creating journal (4096 blocks): done
Writing superblocks and filesystem accounting information: done
格式化完毕后,进行挂载,然后就可以像对待本地目录一样进行相关操作了(拷贝、删除等)
注:下一次登陆iscsi卷后,不用进行分区、格式化了,直接挂载就可以使用了
[root@localhost dennis]# mkdir /mnt/iscsi
[root@localhost dennis]# mount /dev/sdb1 /mnt/iscsi
[root@localhost dennis]# ls /mnt/iscsi/
lost+found
[root@localhost dennis]# cp Downloads/VirtualBox-4.3-4.3.12_93733_fedora18-1.x86_64.rpm /mnt/iscsi/
[root@localhost dennis]# ls -lh /mnt/iscsi/
total 74M
drwx------. 2 root root 16K Jun 27 12:10 lost+found
-rw-r--r--. 1 root root 74M Jun 27 12:13 VirtualBox-4.3-4.3.12_93733_fedora18-1.x86_64.rpm
[root@localhost dennis]#
login with batch script
@echo off
for /l %%j in (1,1,2) do (
    for /l %%k in (0,1,49) do (
        iscsicli logintarget iqn.2007-10.cbxa.com:r5%%j.aa%%k T 192.168.166.100 3260 * * * * * * * * * * * * * 0
    )
)
pause
使用用户名(aa0~aa49)和密码(123456789012)登陆:
iscsicli logintarget iqn.2007-10.cbxa.com:r5%%j.aa%%k T 192.168.166.100 3260 * * * * * * * * * aa%%k 123456789012 1 * 0
防火墙链接限制,外界无法访问Target服务器3260端口。
请在防火墙上手动放开3260端口,或者有条件的话干脆关闭防火墙。
更改防火墙配置并重启生效
vi /etc/sysconfig/iptables
server iptable restart
service iptables stop
setenforce 0
共享的路径都可以有哪些?
在IET的技术文档中规定,以下几种路径是被支持的:
1)一个完整的 block 磁盘,比如/dev/sdb 。
2)一个RAID设备或者是一个LVM.
3)一个虚拟的镜像文件, 如dd使用创建.
“iscsiadm:No portals found”.
service iscsi start 
