This command can find alive hosts on linux:nmap -v -sn 192.168.1.1/24 | grep 'Nmap scan' | grep -v 'host down'
Reference:
- Nmap扫描原理与用法
- 通过ARP探测局域网活动主机
- 编写ARP扫描器探测局域网活动主机
- 如何获取局域网内其他主机的ip地址和mac地址
- icmp探测活动主机
- 利用ICMP数据包探测网络中的活动主机 VC++
- 使用ICMP协议来进行主机探测
- 一个简单扫描器的实现
##sample code
Find alive hosts with ARP protocol
// Find alive hosts with ARP protocol
// Win32 console project, compile with VS2005
// Create by Dennis
// 2013-04-09

// Reference:
// http://msdn.microsoft.com/en-us/library/aa366358(VS.85).aspx

#include <winsock2.h>
#include <iphlpapi.h>
#include <process.h>
#include <stdio.h>
#include <stdlib.h>

#pragma comment(lib, "iphlpapi.lib")
#pragma comment(lib, "ws2_32.lib")

CRITICAL_SECTION  cs;

unsigned long netIp = 0;

// Get host IP
// Reference: http://blog.csdn.net/happycock/article/details/491424
// If your machine have more than one network adapter, you should
// fix this function.
void GetHostIP(char* ip, int size1, char* mask, int size2)
{
    ULONG len = 0;
    GetAdaptersInfo(NULL, &len);
    PIP_ADAPTER_INFO p = static_cast<PIP_ADAPTER_INFO>(malloc(len));
    GetAdaptersInfo(p, &len);
    for (PIP_ADAPTER_INFO q = p; q != NULL; q = q->Next)
    {
        if (ip) strncpy(ip, q->IpAddressList.IpAddress.String, size1);
        if (mask) strncpy(mask, q->IpAddressList.IpMask.String, size2);
        break;
    }

    free(p);
}

unsigned int __stdcall ArpThread(LPVOID lParam)
{
    ULONG MacAddr[2];       /* for 6-byte hardware addresses */
    ULONG PhysAddrLen = 6;  /* default to length of six bytes */

#if 1
    EnterCriticalSection(&cs);
    //converts to TCP/IP network byte order (which is big-endian)
    unsigned long dstIP=htonl(++netIp);
    LeaveCriticalSection(&cs);
#else
    // Reference: http://blog.csdn.net/morewindows/article/details/7429155
    //netIp++;
    InterlockedIncrement((LPLONG)&netIp);
    unsigned long dstIP=htonl(netIp);
#endif

    if (NO_ERROR == SendARP(dstIP, 0,&(MacAddr[0]),&PhysAddrLen)) {
        EnterCriticalSection(&cs);
        BYTE* bPhysAddr = (BYTE *) & MacAddr;
        if (PhysAddrLen) {
            struct in_addr addr1;
            memcpy(&addr1, &dstIP, 4);
            printf("%16s : ", inet_ntoa(addr1));
            for (int i = 0; i < (int) PhysAddrLen; i++) {
                if (i == (PhysAddrLen - 1))
                    printf("%.2X\n", (int) bPhysAddr[i]);
                else
                    printf("%.2X-", (int) bPhysAddr[i]);
            }
        } else
            printf("Warning: SendArp completed successfully, but returned length=0\n");
        LeaveCriticalSection(&cs);
    }

    return 0;
}

int main(int argc, char **argv)
{
    IPAddr SrcIp = 0;

    char strSrcIP[16] = {0};
    char strSrcMask[16] = {0};
    // Get Host IP and Mask
    GetHostIP(strSrcIP, sizeof(strSrcIP), strSrcMask, sizeof(strSrcMask));

    InitializeCriticalSection(&cs);

    SrcIp = inet_addr(strSrcIP);
    unsigned long findMask=inet_addr(strSrcMask);
    int netsize = ~ntohl(findMask);
    netIp = ntohl(SrcIp & findMask);

#if 0
    unsigned long dstIp;
    struct in_addr addr1;
    HANDLE hThr[63] = {0};
    for (int i=1; i<64; i++)
    {
        //converts to TCP/IP network byte order (which is big-endian)
         dstIp=htonl(netIp+i);

         hThr[i-1] = (HANDLE)_beginthreadex(NULL, 0, ArpThread, &dstIp, 0, NULL);
    }

    WaitForMultipleObjects(63,&(hThr[0]),TRUE,INFINITE);
#else
    HANDLE *phThread = (HANDLE*)malloc(netsize*sizeof(HANDLE));
    for (int i=1; i<netsize; i++)
    {
        // _beginthreadex if more effect than CreateThread
        // you can google it for more information
        phThread[i-1] = (HANDLE)_beginthreadex(NULL, 0, ArpThread, 0, 0, NULL);
    }

    // There is a limit count for function WaitForMultipleObjects
    int netcount = netsize-1;
    int waitcount = 0;
    for (int i=0; i<netcount;)
    {
        waitcount = MAXIMUM_WAIT_OBJECTS;
        if (netcount-i<MAXIMUM_WAIT_OBJECTS)
            waitcount = netcount-i;
        WaitForMultipleObjects(waitcount,&(phThread[i]),TRUE,INFINITE);
        i += waitcount;
    }

    free(phThread);

#endif

    DeleteCriticalSection(&cs);

    //system("pause");
    return 0;
}
output as below:(For security reasons, replace some of the characters as asterisks)
  192.168.50.1 : **-**-E2-**-C7-**
  192.168.50.2 : **-**-4C-**-00-**
 192.168.50.16 : **-**-19-**-46-**
 192.168.50.22 : **-**-09-**-3A-**
 192.168.50.28 : **-**-AE-**-E6-**
 ...
192.168.50.129 : **-**-9B-**-19-**
192.168.50.238 : **-**-6F-**-28-**
Press any key to continue. . .
Find alive hosts with icmp protocol
// Find alive hosts with icmp protocol
// Win32 console project, compile with VS2005
// Create by Dennis
// 2013-04-09

// Reference:
// http://msdn.microsoft.com/en-us/library/windows/desktop/aa366050%28v=vs.85%29.aspx

#include <winsock2.h>
#include <iphlpapi.h>
#include <icmpapi.h>
#include <process.h>
#include <stdio.h>

#pragma comment(lib, "iphlpapi.lib")
#pragma comment(lib, "ws2_32.lib")

#define IP_SECTION "192.168.110.%d"

CRITICAL_SECTION cs;
int g_ip_index = 0;

unsigned int __stdcall IcmpThread(LPVOID LPARAM)
{
    // Declare and initialize variables

    EnterCriticalSection(&cs);
    char ip[16] = {0};
    sprintf(ip, IP_SECTION, ++g_ip_index);
    HANDLE hIcmpFile;
    unsigned long ipaddr = INADDR_NONE;
    DWORD dwRetVal = 0;
    char SendData[32] = "Data Buffer";
    LPVOID ReplyBuffer = NULL;
    DWORD ReplySize = 0;

    ipaddr = inet_addr(ip);
    if (ipaddr == INADDR_NONE) {
        return 1;
    }

    hIcmpFile = IcmpCreateFile();
    if (hIcmpFile == INVALID_HANDLE_VALUE) {
        printf("\tUnable to open handle.\n");
        printf("IcmpCreatefile returned error: %ld\n", GetLastError() );
        return 1;
    }

    ReplySize = sizeof(ICMP_ECHO_REPLY) + sizeof(SendData);
    ReplyBuffer = (VOID*) malloc(ReplySize);
    if (ReplyBuffer == NULL) {
        printf("\tUnable to allocate memory\n");
        return 1;
    }
    LeaveCriticalSection(&cs);

    dwRetVal = IcmpSendEcho(hIcmpFile, ipaddr, SendData, sizeof(SendData),
        NULL, ReplyBuffer, ReplySize, 10);
#if 0
    if (dwRetVal != 0) {
        PICMP_ECHO_REPLY pEchoReply = (PICMP_ECHO_REPLY)ReplyBuffer;
        struct in_addr ReplyAddr;
        ReplyAddr.S_un.S_addr = pEchoReply->Address;
        printf("\tSent icmp message to %s\n", ip);
        if (dwRetVal > 1) {
            printf("\tReceived %ld icmp message responses\n", dwRetVal);
            printf("\tInformation from the first response:\n");
        }
        else {
            printf("\tReceived %ld icmp message response\n", dwRetVal);
            printf("\tInformation from this response:\n");
        }
        printf("\t  Received from %s\n", inet_ntoa( ReplyAddr ) );
        printf("\t  Status = %ld\n",
            pEchoReply->Status);
        printf("\t  Roundtrip time = %ld milliseconds\n",
            pEchoReply->RoundTripTime);
    }
    else {
        printf("\tCall to IcmpSendEcho failed.\n");
        printf("\tIcmpSendEcho returned error: %ld\n", GetLastError() );
        return 1;
    }
#else
    if (dwRetVal != 0)
        printf("%16s is alive\n", ip);
#endif
}

int __cdecl main(int argc, char **argv)  {

    InitializeCriticalSection(&cs);

    int netsize = 255;

    HANDLE *phThread = (HANDLE*)malloc(netsize*sizeof(HANDLE));
    for (int i=1; i<netsize; i++)
    {
        // _beginthreadex if more effect than CreateThread
        // you can google it for more information
        phThread[i-1] = (HANDLE)_beginthreadex(NULL, 0, IcmpThread, 0, 0, NULL);
    }

    // There is a limit count for function WaitForMultipleObjects
    int netcount = netsize-1;
    int waitcount = 0;
    for (int i=0; i<netcount;)
    {
        waitcount = MAXIMUM_WAIT_OBJECTS;
        if (netcount-i<MAXIMUM_WAIT_OBJECTS)
            waitcount = netcount;
        WaitForMultipleObjects(waitcount,&(phThread[i]),TRUE,INFINITE);
        i += waitcount;
    }

    free(phThread);

    DeleteCriticalSection(&cs);
    system("pause");
    return 0;
}
Output as below:
  192.168.110.1 is alive
  192.168.110.5 is alive
  192.168.110.6 is alive
 192.168.110.30 is alive
 192.168.110.32 is alive
 192.168.110.35 is alive
 ...
192.168.110.248 is alive
192.168.110.249 is alive
Press any key to continue. . .
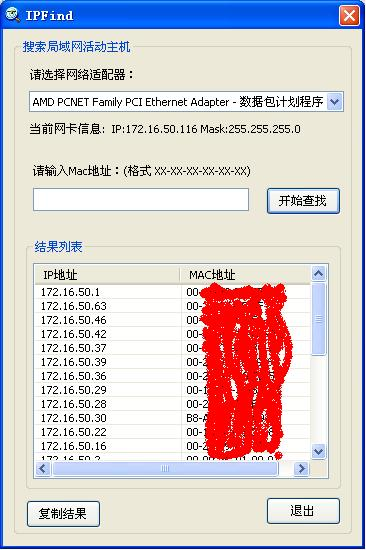
IPFind
I have write a windows application with MFC, you can find the source code and execute file here IPFind